
Experiencing heavy rain in Colorado Springs can reveal hidden vulnerabilities in your home’s exterior. A small crack or worn shingle may quickly turn into a significant issue that threatens your interior space. Understanding how these problems develop is crucial for minimizing potential damage and ensuring your family’s safety.
Ignoring a leak can lead to serious consequences, including mold growth, pest infestations, and costly repairs. If you notice any signs of water intrusion, it’s essential to act swiftly. This guide will help you identify the early signs of a leak, locate its source, and implement temporary repairs until a professional from High Valley Roofing can provide a permanent solution.
Colorado Springs homeowners face unique weather challenges, making proactive maintenance and prompt responses essential. By the end of this article, you’ll be equipped with practical knowledge on managing leaks and documenting damage for insurance purposes.
Key Takeaways
- Heavy rain can expose vulnerabilities in your home’s exterior.
- Understanding leak development helps minimize damage.
- This guide covers identifying and managing leaks effectively.
- Ignoring small leaks can lead to costly repairs.
- Proactive maintenance is essential for Colorado Springs homeowners.
- Learn how to document damage for insurance claims.
Understanding the Signs of Roof Leaks
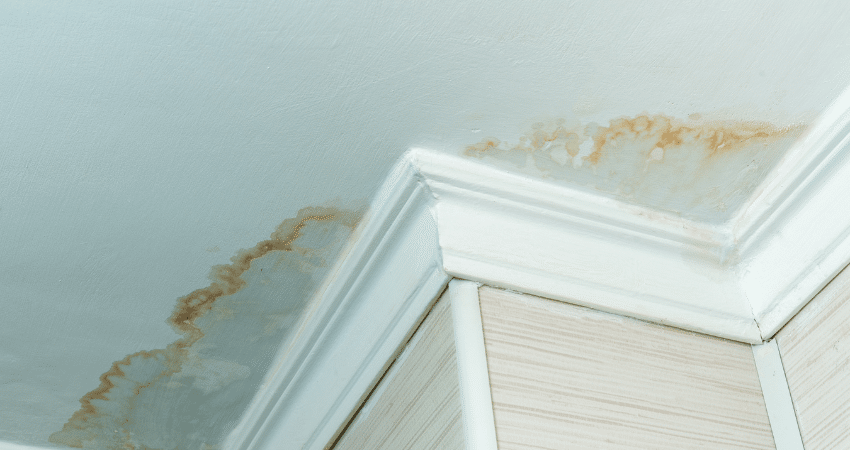
After a downpour in Colorado Springs, you might notice signs that indicate your home’s exterior needs attention. Recognizing these signs early can save you thousands of dollars in potential water damage and prevent mold from taking hold inside your home.
Interior indicators often appear first. Look for:
- Brownish water stains on ceilings, which can indicate moisture intrusion.
- Bubbling paint or peeling wallpaper, both signs of underlying dampness.
- Damp spots on walls that feel cool to the touch, suggesting hidden moisture.
- A persistent musty odor in certain areas, especially in upstairs rooms or the attic, often signals hidden moisture from a slow leak.
Additionally, mold and mildew growth around ceiling corners or near exterior walls are serious signs that leaks have been active for some time. These areas require immediate professional attention.
On the exterior, signs of water intrusion include:
- Damaged shingles that are cracked, curled, or missing, exposing the underlying material to water infiltration.
- Flashing issues around chimneys and skylights, often appearing as cracked caulk or rusted metal.
- Gutters that sag, pull away from the roofline, or overflow during rain can direct water back under the shingles.
- Water stains on exterior walls where the roof meets the siding often point to failed step flashing, a frequent culprit in homes subjected to wind-driven rain.
Professionals advise using binoculars to inspect your roof from the ground after storms. Look for damaged shingles, missing flashing, and debris accumulation that can trap moisture.
Safety First: What To Do Before Inspecting Your Roof
Before you climb up to inspect your home’s exterior, ensure that safety measures are in place. Assessing the conditions is vital to avoid accidents that could lead to serious injuries.
First and foremost, never attempt to walk on a wet roof. Wet surfaces can be dangerously slippery, and any damaged areas may not support your weight. If the weather has been particularly harsh, consider inspecting from inside your attic instead.
If you notice sagging or bulging ceilings, that indicates trapped water. It’s best to stay clear of those areas and address them from below rather than risking a fall.
Using a flashlight while working from inside your attic allows you to trace water stains safely. This method helps you locate the entry point of any leaks without exposing yourself to fall hazards.
When water is near light fixtures or outlets, shut off the electricity in those rooms. Water and electricity are a dangerous combination, so take this precaution seriously.
If you must inspect the roof from the outside after it has dried, follow these steps:
- Use a sturdy ladder placed on level ground.
- Have someone hold the ladder steady while you climb.
- Wear slip-resistant footwear to maintain your grip.
High Valley Roofing strongly recommends calling a professional for any inspection that requires walking on steep pitches or second-story roofs. Remember, taking these safety steps protects you and your family while preventing further damage from occurring.
Even experienced roofers follow strict safety protocols. No temporary repair is worth risking a trip to the emergency room.
| Safety Precaution | Description |
|---|---|
| Wet Roofs | Do not walk on roofs that are wet, icy, or steep. |
| Sagging Ceilings | Stay clear of areas with sagging ceilings to avoid collapse. |
| Attic Inspection | Use a flashlight to safely trace water stains from inside. |
| Electrical Safety | Shut off electricity in areas with water near outlets. |
| Professional Help | Call a professional for steep or damaged roof inspections. |
How to Locate the Source of Roof Leaks
Identifying the exact entry point of water can be more complex than it seems. Water rarely drips straight down. Instead, it often enters through a small opening, travels several feet along a rafter or the decking, and drips far from the actual source. This means that the wet spot on your ceiling is rarely directly below the hole in your roof.
To effectively find the source, grab a powerful flashlight and head into your attic during or immediately after rainfall. This is the best time to trace active water trails and identify wet insulation or stained wood. Follow any visible water marks upward along the decking toward the ridge, as the highest point of moisture is likely closer to the actual source of the leak.
While inspecting, look for daylight shining through the roof boards. This indicates holes, cracks, or gaps where water can enter. Mark these spots for temporary patching and professional repair. Common leak sources include:
- Failed flashing around chimneys and skylights.
- Cracked plumbing vent pipe boots.
- Valleys where two sections of the roof meet, channeling heavy rainwater.
Additionally, missing shingle nails from old satellite dish installations or solar panel mounts can leave small but persistent openings that allow water to seep into your attic over time. Condensation caused by poor attic ventilation can mimic a leak, producing rusty nails, mold spots, and drip patterns that confuse homeowners into misdiagnosing the problem.
High Valley Roofing reminds Colorado Springs residents that finding the source of a leak often requires professional expertise, especially when water damage is widespread or the entry point is hidden. Document the location you find with photos and notes, as this information will be invaluable when you file an insurance claim or schedule a repair with a qualified roofer.
Immediate Steps to Manage Water Damage Inside Your Home
Upon discovering water intrusion in your home, swift action is crucial to minimize damage. The moment you notice an active leak, your first priority is containing the water to limit damage to ceilings, walls, flooring, and personal belongings.
Start by moving furniture, electronics, and valuables out of the affected area. If some items are too heavy to relocate, cover them with heavy plastic sheeting or waterproof tarps to protect them from moisture.
Next, place sturdy buckets, garbage cans, or large plastic containers directly under active drips. Keep extra containers nearby to swap out as they fill during ongoing rain. This simple step can save your floors from significant water damage.
If you notice a bulging or sagging area on your ceiling, it indicates that drywall is holding trapped water and could collapse. Carefully puncture a small drain hole in the center of the bulge with a screwdriver. This will create a controlled stream into the bucket, relieving pressure and potentially saving your ceiling.
Use a wet/dry vacuum to extract standing water from floors and hard-to-reach cracks. After that, wipe down all surfaces with a disinfectant to inhibit mold and mildew growth in the damp areas.
Set up fans and a dehumidifier in the affected room to circulate air and pull moisture out of walls, carpets, and structural materials. This will help reduce the risk of long-term water damage.
Don’t forget to shut off electricity in any room where water is dripping near light fixtures, ceiling fans, or electrical outlets. This precaution eliminates the serious shock hazard posed by water and live wiring.
Finally, roll up area rugs and remove them from the room entirely. Saturated rugs become heavy, promote mold, and can permanently stain hardwood or tile flooring beneath them.
High Valley Roofing stresses that these immediate steps are critical for minimizing the scope of repairs needed later. They also demonstrate to your insurance company that you took reasonable action to mitigate damage.
Temporary Roof Leak Repairs You Can Try Yourself
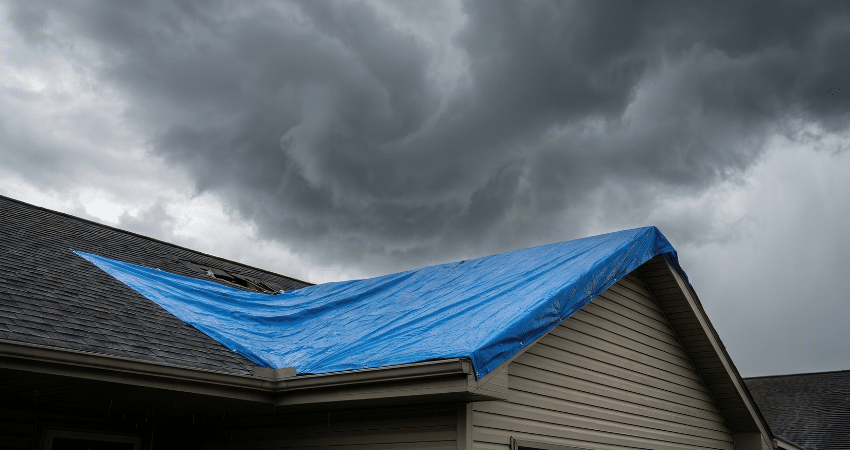
Understanding how to perform temporary repairs can help you manage a water leak effectively until a professional arrives. Quick action is essential to minimize damage and protect your home.
Once you have located the source of your roof leak and conditions are dry enough to work safely, you can apply several temporary repair methods to stop water intrusion until a professional arrives.
Applying Roofing Tape and Cement for Small Leaks
For minor leaks, roofing tape is a straightforward solution. This adhesive-backed flashing tape can be applied from inside the attic, making it the safest DIY option. Simply press the tape directly onto the underside of the decking over the leak.
If you find small holes or cracks in shingles, use plastic roofing cement. Spread it over the damaged area with a putty knife. For added durability, you can reinforce it with a piece of tar paper or roofing felt.
Using Tarps and Heavy Plastic Sheeting for Larger Damage
A heavy-duty tarp is the most reliable temporary fix for larger damage, missing shingles, or holes from fallen branches. When installed correctly, it can protect your home for 30 to 90 days.
To install a tarp properly, use thick 6-mil material that extends at least four feet beyond the damage on all sides. Drape the top edge over the roof ridge and anchor it by rolling the edge around a 2×4 board screwed into the decking.
If a tarp is unavailable, heavy plastic sheeting can serve as an emergency barrier for smaller holes. However, it is less durable and must be checked frequently after each storm.
Sealants, Caulks, and Water-Activated Compounds for Emergency Fixes
For small gaps in flashing, around vent pipes, and where chimney sealant has cracked, caulk and silicone sealants work well. However, they do not bond effectively to asphalt shingles and should be used on metal and masonry only.
Spray-on rubber sealant offers a quick fix for tiny holes and works even in wet conditions. This makes it useful during active rain, though it can discolor roofing materials, so reserve it for areas slated for replacement.
Water-activated patching compounds expand on contact with moisture, allowing you to plug active drips from inside the attic. This can buy you critical time during an ongoing storm when other methods are not feasible.
Every temporary fix is just that—temporary. Schedule a permanent repair as soon as weather and contractor availability allow.
Preventing Future Roof Leak Problems
To prevent future water intrusion, it’s essential to adopt a proactive maintenance strategy. This includes regular inspections, timely repairs, and an understanding of the unique weather challenges in Colorado Springs.
Schedule a professional inspection at least once a year. Ideally, do this in the fall before winter storms arrive. This helps identify damaged shingles, cracked flashing, and deteriorating sealant.
Keep your gutters and downspouts clear of leaves and debris. Clogged gutters can force water to back up under the shingles and into your home’s eaves and walls.
Additionally, trim overhanging tree branches. This prevents them from scraping against your roof during high winds or dropping heavy limbs onto shingles during summer storms.
Address small problems immediately. For instance, replace missing shingles or reseal flashing around a chimney before they develop into widespread damage requiring a full roof replacement.
In Colorado Springs, watch for ice dams during winter freeze-thaw cycles. These can force melted snow under shingles. Ensure your attic has adequate insulation and ventilation to maintain a consistent roof temperature.
Consider installing ice-and-water shield underlayment in vulnerable areas like eaves, valleys, and around skylights. This provides an extra barrier against leaks caused by wind-driven rain and ice buildup.
High Valley Roofing recommends documenting all maintenance and repairs. A well-maintained roof strengthens your position with insurance claims and preserves manufacturer warranties on your roofing materials.
Investing in prevention today saves you significant money, stress, and disruption by avoiding emergency repairs and extending the overall lifespan of your roof.
Working with Insurance and Professional Roofers for Lasting Repairs
Navigating the complexities of insurance claims can be daunting for homeowners after a storm. Understanding the right steps to take can help you maximize your coverage and avoid costly out-of-pocket expenses.
Start by documenting everything thoroughly. Photograph and video record the active leak, any interior damage, and water-stained walls. Make sure to include timestamps and details about when the leak started and what caused it. This information is crucial for your insurance company.
Keep all receipts for emergency supplies, such as tarps and roofing tape. Many insurance policies reimburse these costs when you take reasonable steps to mitigate further damage. Notify your insurance company promptly, ideally within 24 to 48 hours of discovering the leak.
Understand that coverage for a leaking roof depends on the cause. Damage from a sudden storm event is typically covered, while leaks from age or neglect usually are not. When hiring a roofer for permanent repairs or a full roof replacement, choose a local, licensed, bonded, and insured company like High Valley Roofing.
Beware of storm chasers who may show up after a hail storm, offering quick fixes and demanding large upfront payments. These roofing scams can lead to shoddy work and voided warranties. A trustworthy roofing company will guide you through the insurance claims process with transparency and professionalism.
Manufacturer warranties on roofing materials often require professional installation. DIY repairs can void these warranties, so consult with your roofer before attempting any permanent fixes on a leaky roof.
High Valley Roofing has extensive experience working with insurance adjusters in Colorado Springs. They help homeowners secure fair settlements for storm damage and complete lasting roof replacements when necessary.
Investing in a professional repair now protects your home’s structural integrity. It also preserves its resale value and gives you peace of mind that your leaking roof has been addressed correctly the first time.
Conclusion
Dealing with water intrusion after heavy rain in Colorado Springs requires quick thinking and careful action. Throughout this guide, you’ve learned to spot early signs of leaks, manage interior damage, and apply temporary fixes. Remember, these measures are just first aid, not a permanent solution.
Ignoring a leak or relying on temporary repairs can lead to structural damage and costly repairs. High Valley Roofing is your trusted partner for expert leak detection and lasting repairs. If you suspect your home has sustained storm damage, don’t hesitate to contact us today for a thorough inspection and honest assessment of your options.
Your home is your most valuable investment. Protecting it starts with proactive maintenance and the support of experienced professionals.
FAQ
What are the common signs that indicate I have a leak?
Look for water stains on ceilings or walls, mold growth, and dampness in your attic. These signs often suggest water intrusion.
How can I safely inspect my roof for damage?
Always use a sturdy ladder and wear appropriate safety gear. Inspect from the ground for visible issues like missing shingles or sagging areas before climbing up.
What should I do if I find a leak during my inspection?
If you identify a leak, cover the area with a tarp or plastic sheeting to prevent further water damage until you can make permanent repairs.
How can I temporarily fix a leak until a professional arrives?
You can apply roofing tape or sealant to small holes. For larger issues, use tarps or heavy plastic sheeting to cover the damaged area.
What types of materials are best for long-term repairs?
High-quality shingles, flashing, and sealants designed for roofing are ideal for lasting repairs. Always consult with a professional for recommendations.
How can I prevent future leaks from occurring?
Regular inspections, maintaining gutters, and ensuring proper ventilation in your attic can help prevent future issues.
Will my insurance cover roof repairs due to leaks?
Coverage depends on your policy. It’s essential to review your insurance plan and consult with your insurance company to understand your coverage for water damage.
How do I choose a reliable roofing contractor?
Look for licensed and insured professionals with positive reviews. Ask for references and check their experience with similar repairs.